
Feb
09

Valentines Day is coming!
Candy and flowers are great but this year, consider giving a unique gift that will last forever…the gift of a custom photoshoot!
Your shoot includes:
- Gift Certificate – Add a personal message to your gift card.
- Wardrobe and shot consultations to help you get the most out of your shoot.
- As many as two wardrobe changes.
- Traditional couple and interesting artistic shots.
- Both artistic lighting and natural light.
- A variety of black and white and artistic color choices.
- Print quality image files.
- All proofs from your shoot are available for you to download.
- Professional retouching on two images of your choice.
- Additional retouching available on a ‘per-image’ rate.
Special gift certificate offer: Buy your Valentines Day gift certificate before February 14th and receive 1 FREE retouched 8×10 print.
Contact me today to order your gift certificate and for a free quote.

Feb
02
In keeping with my tradition of featuring photographers that have inspired me, I’d like to call some attention to Garry Winogrand. You may know his work, especially his famous shot of Marlyn Monroe’s skirt being blown up in New York. While Garry Winogrand may not be a household name like Richard Avedon, his work to me represents what’s beautiful about “Street Photography”. Garry Winogrand starting shooting as a freelance photo journalist and his work has been featured in over 30 solo and group exhibitions in some of the worlds most prestigious and galleries. What strikes me most about his work is that he has the ability to capture such authentic and beautiful moments. So many of his images, not only freeze a moment in time, but draw me in to each subject. His images inspire my imagination and make me want to know more about his subjects.
You can read more about his life and work here:
New York Metropolitan Museum of Art
Some of my favorite images!


Jan
26
Wardrobe can make or break your professional photo shoot. After choosing the right photographer, putting together wardrobe choices that compliment the image and convey a sense of harmony in your shots is one of the most important choices you can make. Setting up a photo shoot with a professional photographer is an investment. You want your shots to be the best they can be. Put some time and energy into choosing the best wardrobe.
When I book a photo shoot with a new client, I offer a very comprehensive consultation on choosing the right wardrobe. I speak with clients about the style of shots they need to promote themselves, and the wardrobe they’ll need to make sure their images really stand out. Once we’ve come up with a game plan, I send out a very detailed wardrobe consultation package. That wardrobe package will help guide them in taking an honest look at what’s in their closet while giving them time to borrow or buy a few simple looks that will take their images to a whole new professional level.
Here are some of the tips I give to my clients on making successful wardrobe choices:
Your personal style doesn’t necessary make for a good photo.
We all have our own personal style and way of expressing ourselves through wardrobe. Don’t confuse your style or color choices with what makes an excellent image.
Do some homework.
Watch how the professionals do it. There are some incredibly talented wardrobe stylists already doing what you’re trying to do with your wardrobe. Look through magazines; start paying attention to TV commercials, Movies, advertisements. Unless it’s a rich period drama or a fashion spread, wardrobe stylists understand how to dress actors and models for camera. They know how to make sure nothing in the wardrobe pulls focus away from the action, the drama or the actors/models. Even T-shirts that are visible under wardrobe are carefully chosen to blend with the outfit. You’ll rarely see a white T-shirt under a dress shirt unless it’s character specific. More than likely, you’ll see beige, blue, grey; this makes sure that a pop of white doesn’t draw focus. The same rule applies to your shots. You want to make sure nothing in your wardrobe will pull the eye away from what’s most important – YOU.
Solid rich and subtle colors
You may love paisley or pastels, leopard prints, stripes, bright reds or solid blacks. But these prints, patterns and colors pull the eye away and distract the viewer from you. Stick to solid colors. You can layer your outfits but the color pallet should be subtle changes and compliment each other.


Successful colors
We all have different skin types. It’s important to know what types of colors look best on you. Myself, I have more of a ruddy complexion so cooler colors are better for me. What ever your skin colors, there are a ton of subtle shades of that pallet that will look amazing on camera. If you look great in blue, go for a darker earthy blue rather than a bright baby blue. If you look great in green, choose something darker and subtle rather than neon lime green. If you like reds; then choose a darky dusty burgundy, instead of tomato red. This isn’t to say that you don’t look amazing in those big bold colors, but we’re choosing colors that will keep the eye where it belongs -On you.
Pick complete looks
Finally, if when you’re putting together wardrobe choices, lay them out so you can see them together. Pick complete looks, including t-shirts, belts, pants, shoes and jewelry. Keep your jewelry choices simple; nothing to big and bold that distracts. Make sure you feel good about each look; that the clothes fit well and are pressed and cleaned.
So remember – your personal style is amazing, but chose colors, wardrobe and jewelry that will look best for camera. It will take your shots to a professional level.
Jan
11
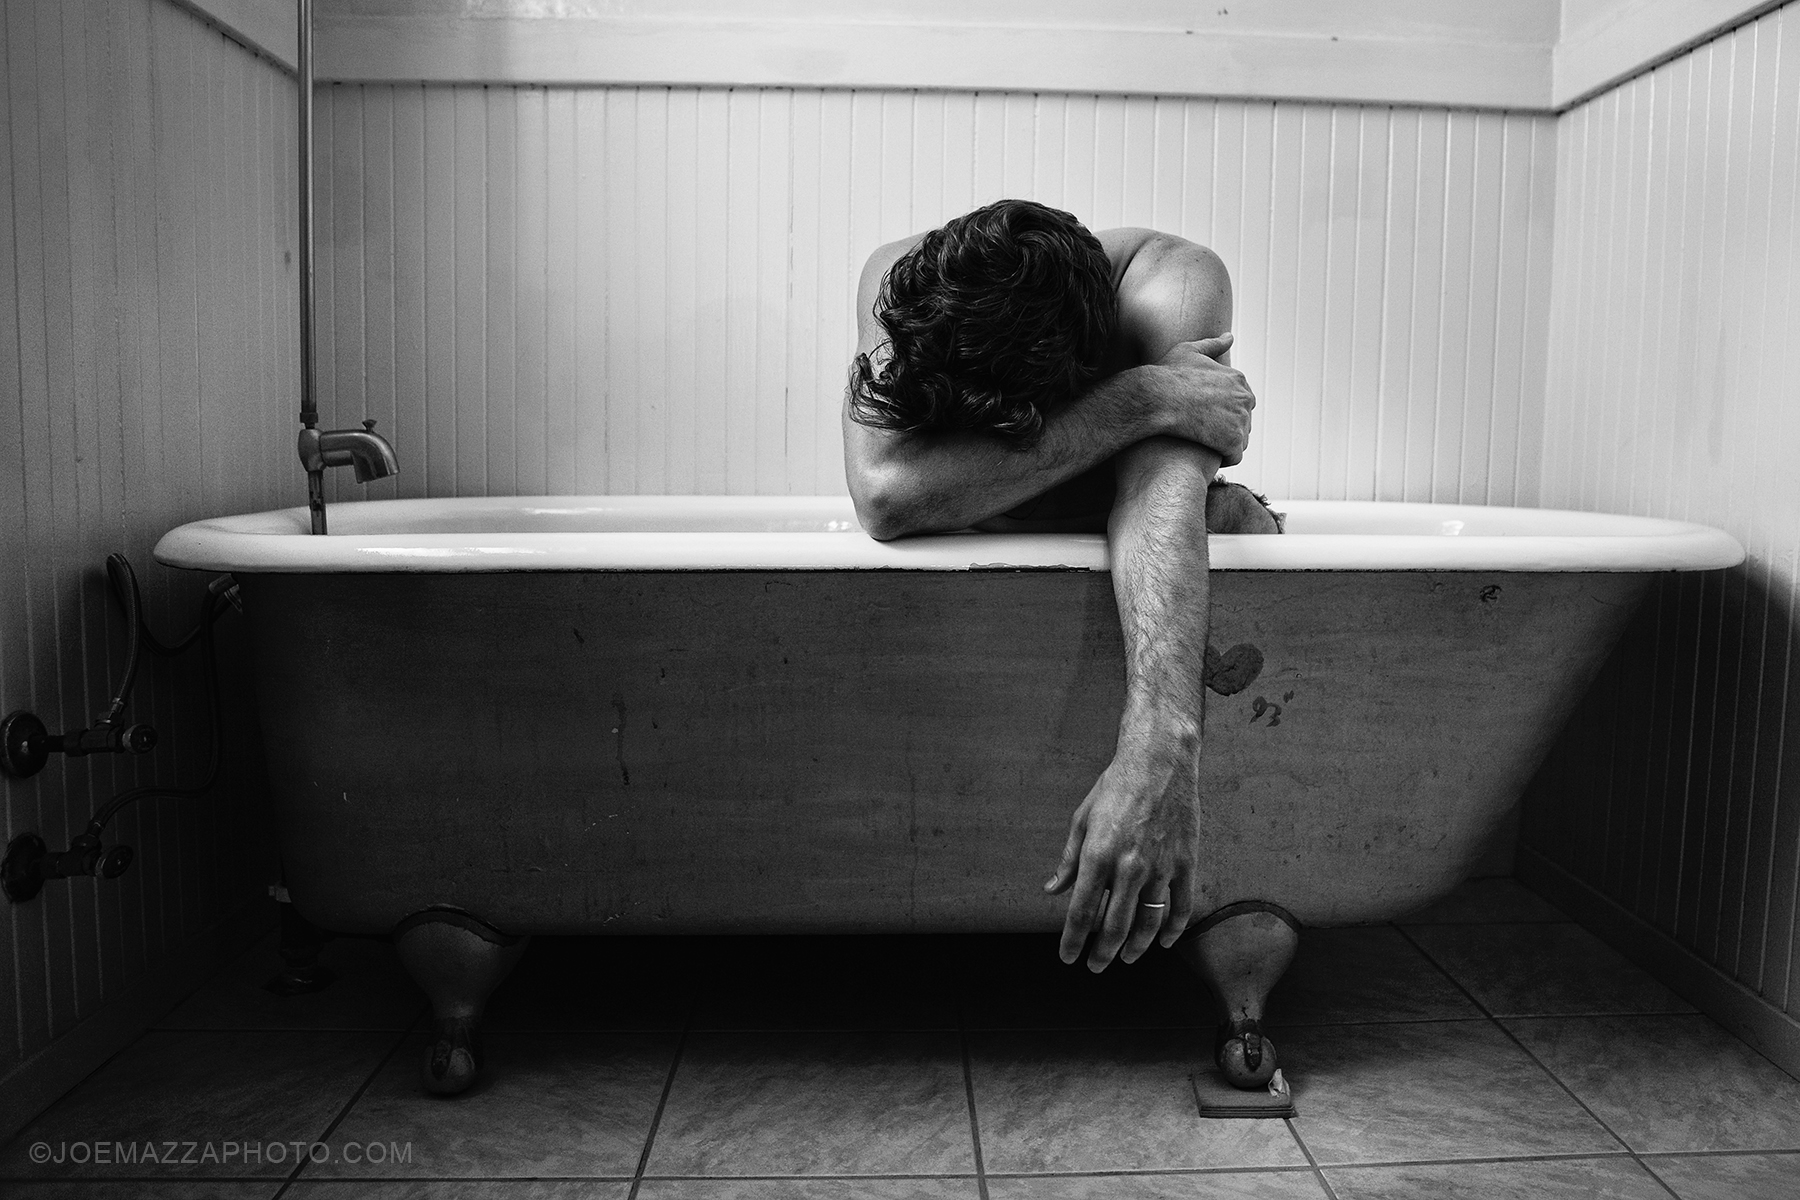
Treat yourself to a “Model Experience”

Have you even wanted to have a model experience? To appear in a magazine quality shoot and have the images for your own use? These shoots are designed for you!
These shoots are a FUN and artistic collaboration designed for people who have always wanted to capture new and unique sides of themselves, and to have high-end artistic prints that they can either proudly display on their walls or share with their partners or perspective dates.
Beat the cold and the rain in a hot bathtub! Take advantage of my locations or I can come to your home and we can set it up there in a comfortable environment.
Examples of past shoots. (Some NSFW) content.
Your shoot includes:
- Wardrobe and shot consultations to help you get the most out of your shoot.
- Individuals or add $100 for a couple shoot.
- As many as four wardrobe changes.
- Fashion or artistic physique shots.
- Both artistic lighting and natural light.
- A variety of black and white and artistic color choices.
- Print quality image files.
- All proofs from your shoot are available for you to download.
- Professional retouching on two images of your choice.
- Additional retouching available on a ‘per-image’ rate.
- Discresion and privacy guaranteed.
* All models appearing in the above images have given their express permission.
Special $100 discount for January and February 2016 – Discounted Rate: $350
Rates are for an individual model, two-hour photo shoot (one location), which includes all of the features, listed above.
Additional time, wardrobe changes, couple shoots, locations and retouching are available for an additional fee.
Contact me today to inquire about setting up your shoot!
Nov
24
One year, during the Holidays, my Mom brought over a box of family photos. These amazing black and white images spanned many generations and chronicled the history of my family. There were photos of aunts and uncles, grandparents and friends, many of whom have long passed away. There were photos from Christmas’s and Thanksgivings, some of which I remember vividly as a child but many of those years I hadn’t been born yet. This was a potent visual documentation of my family and it was an incredible experience to view this reminder of where we’ve come from.

If you’re like me, you’ve become the non-official self-appointed family photographer. That’s an important job. One day, the photos we are taking today will be viewed by future generations in the same way I viewed our family history.
If I could give just two tips for photographing Thanksgiving this year it would be these two:
1. Approach your shots with heart. Begin to see the your shots from the perspective of a historian. Yet another shot of that beautiful turkey is always nice but remember to capture personalities, laughter, tenderness and celebration. Find those candid moments that really let the viewer feel the energy of the day; let future generations see what it was like back in the old days of 2015.
2. Put yourself in the photos. Don’t let the history of your family or friends be told in photos without you. You are an integral part of this story. Try giving your camera to a trusted family member or friend and have them take over for a while making sure you’re in some of the shots. And of course, Selfies with friends and family are one of the best ways to make sure there are some shots of you. Don’t hide this year, be a part of it!
Happy Thanksgiving!!
Nov
17
We offer custom order gift certificates for any occasion.

Fully Customizable:
- Write a personal message for the recipient
- You can email a digital gift card or have a print quality gift card file sent to your email for you to print.
- Choose the type of shoot you’d like to order: Studio portraits, outdoor location, home shoot.
Flexible payment options:
- Pay for an entire shoot.
- Select a dollar amount that you’d like to contribute.
- Make a non-refundable $100 down payment deposit now and pay the balance the date the recipient books their shoot.
To order your shoot today:
- Contact me
- Name of recipient
- Any personal message that you’d like to include
- Dollar amount. Specify if you’d like to pay for the entire photo, give a set dollar amount or pay a deposit now and the balance the day the shoot is booked.
- Include your email address and phone number so I can contact you to set up your gift card and give it that personal touch.
* Gift certificates must be redeemed within one year of the date of purchase.
Nov
05
My friend Michael sent me a link to this article today and it really moved me. The focus of the article and accompanying video was on the artistic eye of the photographer; specifically, how portraits can be shaped by the photographer’s point of view rather than just the subject being documented. In this video, the same person was photographed by six different photographers – the twist: Each photographer was given different information as to the background of the subject. The subject’s backgrounds were varied and fictional. The result: incredibly different portraits of the same man.
In my work, I strive to bring out the personality of each subject I photograph. Getting to know who that person is shapes the style and direction of each portrait. It’s one of the most rewarding aspects to my craft. This article really hit home and reminded me of how important a photographers eye and vision is to portraiture.
Enjoy this contribution from www.shutterbug.com
Thank you Michael Armentrout for sending me the article.
Oct
28

Halloween keeps sneaking up on me. My friends seem to always be ten steps ahead of me, planning their costumes and finding the right party or haunted house to attend. Me, on the other hand, wakes up on Halloween day with no costume and no plan. Which is why I suppose I’d rather photograph the costumes than wear them.
If you’re planning to take photos this year, here are a few tips to make them stand out.
Shoot as much as you can before it gets dark.
Photography is all about using light so if you want to capture some nice images shoot at dusk. If there’s still some light available you’ll be able to include the background in the shot and avoid using your flash
Stoop down to the level of your subject.
If you have kids and you’ve dressed them up in adorable costumes, make sure you get down to their level to compose your shot.
Fill your frame.
Whether you’re shooting with your iPhone or a nice digital SLR, move closer to your subject compose your shot. Take a few shots, one wide and some close up portraits.
Keep still.
If you’re shooting stationary objects like a jack-o-lantern or other Halloween accessories, take your time, keep your camera steady and try a slightly longer shutter speed. If you can, use a little tripod or set your camera down on something stable so you don’t have camera shake.
Have a safe and sane Halloween!
Oct
20
Inspiration: Arnold Newman

Every few months I like to feature a photographer who whose work has inspired not only myself, but has influenced thousands of photographers throughout the years. Before Annie Lebovitz, who took up the mantel of portrait and fashion photography, there was Arnold Newman. His work has spanned decades and he’s documented the faces of some of the world’s most influential people; including six U.S. Presidents, artists and world leaders. He was the first notable person to compose portraits using the environment of the subject to create a more complete and dramatic image. While this may seem relatively common in today’s portrait work, it was ground breaking at the time and his techniques still influence the way I design shoots for my clients.
-

- Edward R Murrow 1951

-

- Eleanor Roosevelt 1962

-

- Ansel Adams 1975

-

- Woody Allen 1996

-

- Ayn Rand 1964

-

- Frank Lloyd Wright 1947

-

- Golda Meir 1970

-

- Jackson Pollok 1949

-

- Leonard Bernstein 1968

-

- Pablo Picasso 1954

-

- Salvador Dali 1951

-

- Photographing President Kennedy

-

- Newman and Ansel Adams 1975

-

- Newman and Picasso

-

- Yassir Arafat 1993

Arnold Newman (1918-2006) is acknowledged as one of the great masters of the 20th and 21st century and his work has changed portraiture. He is recognized as the “Father of Environmental Portraiture.” His work is collected and exhibited in the major museums around the world including the Metropolitan Museum of Art, New York; The Museum of Modern Art, New York; The Chicago Art Institute; The Los Angeles Museum of Art; The Philadelphia Museum; The Tate and the National Portrait gallery, London; The Israel Museum, Jerusalem; and many other prominent museums in Europe, Japan, South America, Australia, etc.
Newman was an important contributor to publications such as New York, Vanity Fair, LIFE, Look, Holiday, Harper’s Bazaar, Esquire, Town and Country, Scientific American, New York Times Magazine, and many others. There are numerous books published of Newman’s work in addition to countless histories of photography, catalogues, articles and television programs. He received many major awards by the leading professional organizations in the U.S. and abroad including the American Society of Media Photographers, The International Center of Photography, The Lucie Award, The Royal Photographic Society Centenary Award as well as France’s “Commander of the Order of Arts and Letters.” In 2005, Photo District News named Newman as one of the 25 most influential living photographers. In 2006, Newman was awarded The Gold Medal for Photography by The National Arts Club. He is the recipient of nine honorary doctorates and has lectured and conducted workshops throughout the country and the world.
Arnold Newman died on June 6, 2006 in New York City. He was 88 years old.
source – www.arnoldnewman.com

Oct
14
I often get hired to shoot events for my corporate clients with two goals in mind: Capture the energy and feel of the event, and capture images they can use to promote their company. This event at RN74 Restaurant in San Francisco gave me the perfect opportunity to achieve both of those goals.
In today’s visually oriented social media climate, professionally captured images are key to raising your brand awareness and bring a very impressive visual polish to your company.
Contact me today to find out how we can help you succeed!


Sep
29
I had the opportunity to work with one of my clients last weekend to create branding images for their business. We spent the day in the Napa Valley at Continuum Winery, the new label for the Mondavi Family. It’s an amazing hilltop winery and a perfect location for high end wine tasting and special events. As a photographer, it was a beautiful backdrop to create the images they needed to really capture the style and class of the events the produce for their clients.


Sep
16
I’ve added some new prints to my online gallery store. These are high quality fine art quality images printed on premium paper and available as is or choose from a variety of frames, matting and museum quality glass.


Sep
08
A few months back I posted a five part series in getting the most out of your iPhone photography, including links to several social media apps for sharing your images. I thought I’d go a little deeper into one of those apps – Pinterest. Pinterest has been around for 5 years now and with all of the super trendy web sites and apps out there you may ask yourself, “Why Pinterest“? There are plenty of web sites that allow you to share photos, network or just get inspiration. But what makes Pinterest so interesting is that it’s different things to each person who uses it. You can share your own images or share images from any online source. You can share ideas with other users or make your boards and post private so you’re the only one who sees them. You can get inspiration for hobbies, travel or things you dream about achieving and organize those images on a big board. It takes the place of the old fashioned bulletin boards, photos and thumb tacks. For the visual person, it can be an incredibly powerful tool.
CLICK Here to check out my boards on Pinterest

How people use Pinterest:
- Get inspiration for their hobbies or careers (57%)
- Store images of things they dream of having or places they dream of traveling. (53%)
- Keep their thoughts and ideas organized (47%)
- Share their ideas of others (52%)
source
It may not be useful for everyone but you can’t deny that over the past year Pinterest users have increased by 97% over the previous year: more than any other form of social media.

If you’re a dreamer, a creative person, or just need to organize your thoughts and ideas in a visual way, Pinterest is worth taking a look at.
Sep
01
I have a short list of photographers who’s life and work have inspired me. Annie Leibovitz, Dorothea Lange, Richard Avedon to name a few. What draws me to a particular photographer, is a combination of the images they captured, the time in which they lived and obstacles they had to overcome in order to capture those images. Nothing could be more inspiring to me than the women, who in the turn of the century did not even have the right to vote and yet set out on incredible adventures across the globe to share their view of life. The woman who was truly THE pioneer of her time was Isabella Bird.
 Isabella was born in 1832 in England. The daughter of a prominent Church Official, she was frail and sickly as a child. After the death of her parents she began to travel the world, visiting Australia, Hawaii (then known as the Sandwich Islands), America (where she explored the Rocky Mountains on horseback in 1878). After the death of her husband, Isabella made several trips to Central Asia, the Middle East, India, Tibet, Turkey and Kurdistan. She was a prolific author, was called by the London Times “The boldest of Travelers” and was the first woman named as a member of the Royal Geographic Society.
 Today, we pull out our paper thin iPhones and with the push of a button on a screen we can capture anything we want. I am overwhelmed, not only by the courage it took for Isabella to travel to such remote and wild locations, but by the daunting logistics involved in capturing each one of her stunning images. The cameras of that day were huge, heavy and required an even heavier wooden tripod, and yet, she was able to expertly expose her images and engender such trust in her subjects. Even with a staff of guides and Sherpa’s, for a woman in that time to orchestrate and document years of travel was a monumental feat.


Here’s the pioneers of photography; And to Isabella Bird.
Aug
25
Never has the photo world been so friendly to amateur photographers than it is now. With the advent of social media platforms, like Instagram where you have access to creative tools and filters, the amateur photographer can even turn the mistakes or mishaps into something interesting. If Black and White photography is your passion, you can create some amazing images with just a few tips.
All of these images were shot with and iPhone 5 and iPhone 6.
- Contrast is a good thing.
There are times during the day where the bright sun makes it next to impossible to capture the image you want. Those days can be productive if you begin to look at your surroundings like a black and white movie. For cityscapes or landscapes; look at shadows, clouds and contrast. You may not have the light for nice family portraits but that sun will give you all kinds of gifts if you look for them.


- Drop your exposure
When you convert photos to black and white, the ‘whites’ can easily get blown out if you exposed your image for color. If you plan on shooting in black and white try dropping your exposure a bit so the whites (like clouds) retain their texture.

To find out how to adjust the exposure in your iPhone camera, check out last month’s series on getting the most out of your iPhone.
- Flat and cloudy days can make for interesting black and white shots.
We’ve all gone out to shoot only to find the light isn’t cooperating. On days like those, begin to imagine what your black and white shots might look like. Play with interesting angles, composures and perspectives.

- Use black and white to create drama.
Sometimes you’ll come across a scenario when you’re shooting that might move you; there is a sense of emotion being conveyed. These images can be the most impactful when they’re shot for black and white. The absence of color can remove the distractions bring the viewer right into the scene.

Apr
24
In this final post I’ll recommend some great smart phone App’s that will help you take your images to the next level.
Recommended APPs:
If I had to chose ONE app that I use the most for my iPhone photos it would be:
 CAMERA+
You can shoot your images directly in this App, or process them later. The “lab” features are stellar.
Other Recommended App’s:
 Photoshop for iPhone
Lot’s of great filters, and image processing features.
 Flickr
A photo-sharing community that also lets your print.
 Framatic
Awesome app for doing photo collages for posting your images on-line.
 Instagram
We all know what instagram is. A great way to share you photos. Link your Facebook and Twitter accounts if you want. Easy to share your images.
 Pinterest
Share you inspiration and get inspiration from others.
Print your photos:
 LifePics
LifePics lets you order prints from several local stores on their network – Photofinisher Network. According to their website there are over 12,000 stores located all over the world. he app uses your GPS to find local stores near you that you can order photos from. You can also use this app easily while traveling just use the “Get Location” option to find stores on the go. The prices range based on which retailer you pick inside the app so it might be worth viewing options. 4×6 at Office Depot run $0.15 each.
 Shutterfly
Shutterfly is a popular photo sharing site that provides a large number of personalized photo gifts- calendars, photo books, coffee mugs, calendars and more. I am assuming because of the diversity of their photo offers that is why Shutterfly opted not to add the Cart/Order process directly in the app. But you can upload your iPhone photos into your shared Shutterfly albums from the phone or using the camera directly.
 SnapFish
Snapfish is similiar to Shutterfly in that you can order customized gifts from your photos. The app allows you to add photos to your albums and download existing photos from your online album onto your phone. The multiple upload feature worked pretty quickly. Perhaps a photo book of your instagram photos might make a fun coffee table book! *in app photo ordering is not available
 CVS Photo
there is a CVS less than a mile from my house. So CVS photo center is my go-to photo printing source. Until I discovered this app I saved photos from my iPhone to my computer then ordered prints on CVS website for pick-up at their 1 hour printing station. With the app I can now upload photos (albeit 1 at a time) to my CVSphotos.com account. It does appear I have to actually “order” from a computer but getting the photos in the album saves a lot of time.
 Walgreens
This app has versatility. Photos: you have the option of uploading photos (multiple) from your camera roll or using the camera – you can also upload to Facebook & Walgreens inside this app. After uploading your photos easily order prints with a big “Print & Share” bottom.
Apr
23
So, you’re back from your amazing vacation and you captured the whole trip on your iPhone. You’ve taken some beautiful shots and you’d like to get them printed or put together a book to remember your trip. What do you do? Today I’ll give you some tips on printing your iPhone photos.
Quick tip: The images you take with the main or back lens of your camera will be larger and better quality than the “selfie” front lens of your camera. So if you plan on large prints, use the main lens.
The first thing you should know is that it’s incredibly easy now to upload photos and have them printed. There are quite a few app’s that allow you to upload photos directly from your camera roll to the print labs. I’ll list those apps in second. If you want to skip the technical part, just scroll down.
First, a quick crash course on iPhone photo resolution:
Each successive iPhone model has come out with better cameras, larger megapixels and better lens’s. If you mostly just post your photos online, a large megapixel camera isn’t necessary. The biggest benifit with large megapixel cameras is when you go to enlarge your images. The larger the megapixels the bigger the file – the bigger the file the bigger the print. Your iPhone saves the images you take in 72 dpi, or the more current ‘ppi’ resolution. ‘DPI’ means: “Dots Per Inch” and “PPI” means “Pixels per Inch”. This is how much pixel information is contained in one inch. Computer monitors only require 72 dpi or ppi to view a photo. Since most iPhone images are used online and viewed on computers, that is the default setting for your iPhone. Most digital printers are set for 300 dpi for the best quality images so they must be converted/resized to 300 dpi so they can be printed.
Here is a chart showing you how large the images are (at 72 dpi) on different iPhone models:

Once these images are converted for printing it roughly translates to this:
| Photo Size in Pixels | Good Quality 150 ppi | Medium Quality 200 ppi | Best Quality 300 ppi |
|---|---|---|---|
| 800×600 px, 0.5MP | 5.33″ x 4″ | 4″ x 3″ | 2.67″ x 2″ |
| 1024×768 px, 0.75MP | 6.83″ x 5.2″ | 5.12″ x 3.84″ | 3.41 x 2.56″ |
| 1600×1200 px, 2MP | 10.67″ x 8″ | 8″ x 6″ | 5.33″ x 4″ |
| 2048×1536 px, 3.2MP | 13.65″ x 10.24″ | 10.24″ x 7.68″ | 6.83″ x 5.12″ |
| 2592×1936 px, 5MP | 17.28″ x 12.9″ | 12.96″ x 9.68″ | 8.64″ x 6.45″ |
| 3264×2448 px, 8MP | 21.76″ x 16.32″ | 16.32″ x 12.24″ | 10.88 x 8.16″ |
Ok, so there’s a little background on print vs internet resolution. For a handful of iPhoneographers who like to process their own images in Photoshop these are useful tools in prepping your images for printing.
Quick tip: When you crop your images, they loose pixel dimensions. Use the tips I mentioned in earlier posts about “Filling your Frame” when you snap your photos. If you get into the habit of not using the zoom feature and composing your images exactly the way you want them printed, you’ll have the full pixel dimensions available to you with more options for larger, better quality prints.
Great App’s for uploading and printing your photos:
There are a bunch of apps you can download that offer all kinds of print services ranging from simple and inexpensive snapshot prints to photo books, enlargements, merchandise and gallery wrapped prints. These labs will automatically convert your 72 dpi images to the best quality for prints; all you have to do is upload them directly from your phone. Here are a few for you to check out. Tomorrows final post will have a much bigger “must have” list of app’s.
LifePics: lets you order prints from several local stores on their network – Photofinisher Network. According to their website there are over 12,000 stores located all over the world. The singup and photo upload process is pretty simple. The app uses your GPS to find local stores near you that you can order photos from. You can also use this app easily while traveling just use the “Get Location” option to find stores on the go. The prices range based on which retailer you pick inside the app so it might be worth viewing options. 4×6 at Office Depot run $0.15 each
Shutterfly for iPhone: Shutterfly is a popular photo sharing site that provides a large number of personalized photo gifts- calendars, photo books, coffee mugs, calendars and more. I am assuming because of the diversity of their photo offers that is why Shutterfly opted not to add the Cart/Order process directly in the app. But you can upload your iPhone photos into your shared Shutterfly albums from the phone or using the camera directly. Shutterfly offers discounts and promotions frequently so I’d recommend this option for parents who will be printing multiple copies and ordering photo gifts from photos of their little ones.
Snapfish: Snapfish is similiar to Shutterfly in that you can order customized gifts from your photos. The app allows you to add photos to your albums and download existing photos from your online album onto your phone. The multiple upload feature worked pretty quickly. Perhaps a photo book of your instagram photos might make a fun coffee table book! *in app photo ordering is not available
Tomorrow – Must have photo App’s for you iPhone.
Apr
22
Photographers use light to paint their subjects. We’re constantly looking at the direction and quality of light at different times during the day. Whether it’s natural light or artificial, paying attention to your light will help you create the kind of shots you’re looking for.
When I’m shooting outdoor portraits, landscapes or architecture only shoot at times during the day when the natural light is soft and warm; this limits shooting to early morning or late in the afternoon for the ‘golden hour’. Since most of us use our iPhone cameras to capture moments in our lives it’s not practical to wait for the sun, we want to capture that moment and move on with our day. So with that in mind, here are a few little tips to help you adapt to the light you have.
Full afternoon sun: Photographing people in the middle of the day with full sun is tricky. It can create pretty harsh shadows on their faces. There are a few tricks to help you navigate harsh lighting conditions. Turn on your trusty flash. This one of those moments where your flash comes in quite handy and can really help fill in those dark contrasting areas.
If you have an option to get out of that sun, find some shade, perhaps close enough to a bright object so the sunlight will actually “bounce” on to your subject. Your iPhone should asses the darker conditions and give you a correct exposure but if you keep getting dark images, refer to the focus/exposure lock feature on the first day of these tips. Press and hold the area on your screen (your subjects in shade) until your camera locks in the correct exposure and snap your photo.
Look for back light: This is tricky, you definitely need the right quality of light but if you’re shooting at the end of the day and there’s some soft beautiful light available. Shoot a few shots with the sun directly on your subject, then flip you position and put the soft sunlight either behind your subject or slightly behind and to the side. You’ll see a lovely highlight on their hair. Use the focus/exposure lock again to make sure you phone exposes your subject properly and snap you shot!
Lighting too harsh – shoot for black and white: You can’t really control the quality of natural light during the day. Some days it’s cold and foggy, other days it’s bright and harsh. On days when I get harsh light but still want to shoot, I switch my eye to finding contrasts and I shoot my images knowing that I’m shooting for black and white photos. Black and white imagery can be very powerful when you embrace the shadows and contrasts.
Using light without your flash indoors: If you’re shooting snapshots and people having fun, use that flash and capture some great moments. But, sometimes you just want to get some interesting artistic shots with your phone. Look for interesting light sources to light your subjects. Candles, lamps, daylight streaming in through a window all create some drama and some fun creative shots!
Coming tomorrow – Day 4, Must have iPhone camera App’s
Apr
21
We’ve all done it, we see something interesting, grab our phone with one hand and snap a bunch of photos. Sometimes they turn out while other times…well, not so great. Composition is a big part of setting up a shot. It doesn’t have to be complicated, In fact, with a few simple tips you can take your average snap shot and give it an artistic feel. Here are few tips to take your composition to the next level.
1. Have a steady hand: Hold your phone the way you would hold a camera. Use two hands to keep it steady and use your index finger to gently tap the shutter button. Most iPhones will allow you to use the volume button to snap the shutter but I find that to be a little cumbersome and it can sometimes shake the camera. I use the shutter button on the screen.
2. Check your frame: The most common error in composing a shot is to leave a huge amount of room at the top of the frame; especially when you’re capturing a group of people. You may have to physically move forward or backward to fill that frame with exactly what you want.
Also, I good rule of thumb when photographing people is to put yourself on the same plane/level as they are; unless of course you’re shooting down from above for artistic effect.
3. Rule of Thirds:
This is a commonly used photography term for putting your subject in one third of the frame while the other 2/3rds create a negative space. Try playing with your framing to create a little more drama in your shots.
4. Angles: If you don’t want a straight forward shot, play with some angles. Tilt your camera in different directions to give your subject a more interesting angle; this is especially good for architecture.

5. Try having a point of view or focus point: Sometimes we want our foreground subject to be in perfect focus while the rest of the images falls a little blurry. This is called “Depth of Field”. Try framing your subject in the foreground, perhaps even to one side of the frame, tap on the focus lock feature so your camera knows what to focus on and then snap your shot. The rest of the image should fall away in soft focus.

Coming tomorrow: Playing with Light
Apr
20
A few years back I was watching an interview with Annie Leibovitz. Brian Williams asked her:
“What do you tell people when they ask you what kind of camera to buy?”
Her response :
“The iPhone…really, that is the snapshot camera of today”
I found that to be true for myself as well. I have several cameras. The big Canon with the handful of lens’ I use for work is amazing. I love my Canon but when I’m done working and just want to shoot for fun, my go-to camera is always my iPhone. The quality of images with the new iPhone 6 are stellar. It’s an 8 megapixel camera with improved low light (f2.2) abilities. Not to mention the 1080p hd video. If you don’t have the iPhone 6 yet don’t worry, the 5’s are also great cameras; very intuitive and easy to use. But even the best cameras need a little coaxing in certain situations to get the best shots. With more and more of us relying on our iPhone’s to capture moments or to just express ourselves creatively through Instagram, Tumblr, Flickr, Facebook etc. I though a few tips on iPhoneography would be helpful.
Today’s tips: Knowing how your camera works.
Tap or touch….Instant correct exposure.
Your iPhone has a passive auto focus and exposure system; meaning, it takes into account all the light in the frame and sets an average exposure. In most cases, for landscape photos in full sun it does a great job. But there are times when the subject you want to focus on is either much brighter or darker than the background in the rest of the frame. In that case If you haven’t already discovered this on your own, this tip will literally change the way you shoot with your iPhone.
There two ways of controlling the correct exposure or focus on your iPhone:
- Quick focus and exposure – tap once on your screen in the exact place where you want to set the exposure and focus. – a little yellow box will appear. – snap your photo.
- Focus lock – Same principle as the quick focus except this time, press and hold in the spot on your screen until the yellow box appears again. It will engage the auto focus/auto exposure mode and it will remain in that setting until you take your shot. This is particularly helpful when you want to slightly recompose your shot without having your camera constantly changing the exposure.
The Flash:
I prefer to keep the flash turned off, only using it when it’s needed. If you’re indoors and want to take some flash shots, don’t stand too close to your subject or the flash will blow them out and make them look like ghosts. Your flash works best between 5-9 feet from the subject. Once you go beyond 12 feet the flash is much less effective you’ll start to lose quality.
The digital zoom feature:
Don’t use it. You’ve probably noticed that the quality of the image suffers when you zoom in. This is because the zoom feature on the iPhone is only a digital zoom. If you want to zoom in, walk toward your subject until you have the frame you want. You’ll end up with much better quality images.
Clean your lens:
Our grubby finger prints are all over our phones. That, combined with pocket lint will make give your lens an oily dusty film. Ideally, use a very slightly moist lint free cloth to clean it. If you don’t have one, Use a soft article of clothing – like your shirt.
Coming up; improving your composition.
Aug
26
It’s been many months in the making but my online store is now live and ready.
This is a small collection of both commissioned and non-commissioned work that I’ve shot over the years. Until now, these images have been only been available by special request. I’m excited to be offering these personally selected prints to the public. All prints are available in a variety of sizes, premium papers and reproduced by one of the best photo labs in the country. You can order these prints ‘as is’ or design the perfect frame, mat and glass to compliment your home.


Aug
21
I’m very excited to be working on the finishing touches of my online store. Next week it will be open to the public and for the first time, you will be able to order prints as well as design a custom frame and mat for your images!
Stay Tuned!
Mar
26

I don’t think there is a photographer working today that hasn’t paid homage to Richard Avedon at some point in their careers. He is on almost every list of the most influential photographers of the 20th century with a career spanning over sixty years.
You know his work, you’ve seen his images but perhaps didn’t know they were taken by him. His photos captured the image of America that was style and fashion; helping to shape the way the world viewed us and the way we viewed ourselves. He brought a fresh perspective to portraiture by capturing sides of his subjects so rarely seen in the public eye; and he shot EVERYBODY. His portrait collection includes almost every famous or influential figure of the 20th century. His work in fashion was groundbreaking, often capturing movement and emotion rather than stiff poses.

I think the most fascinating bit of Avedon history is not how many famous people he photographed, rather it’s his beginnings that interests me the most because I think they were pivotal in helping him develop his style. His first job as a photographer was in the Merchant Marines where he took identification photos. I can’t help but think about how those days must have felt to him. Every day he had people pose, motionless, until he snapped a photo on his old Rolleiflex Camera. How many thousands of stiff boring photos did he take? It’s no wonder he demanded movement and personality from his subjects! Perhaps his style was born partly from the technical experience he gained and out of rebellion for taking the same photo every day for two years.
What jobs are we doing now that are, unbeknownst to us, preparing us for great things? Something to think about….


Mar
13
So you don’t have the budget for a team of wardrobe, hair and makeup stylists to get you ready for your shoot? No problem! A little creativity and some planning will reap huge rewards in the quality of your images. Just remember there are FIVE things you must have for your shoot:
- Have a goal
- Have a wardrobe
- Have good Hair and/or Make up
- Have energy
- Have fun
I’m going to poke some fun at my friend Phil’s expense to show you want I mean. Phil and I have been friends for quite a while and he has my eternal gratitude for gladly volunteering to be a test subject whenever I had a crazy shoot idea. Because of these informal creative outings we’ve always had a pretty relaxed attitude when it came to shooting. A few years back Phil wanted to take some photos that he could use for his acting/modeling career – something vaguely reminiscent of an Abercrombie and Fitch Ad.  I left it to him to put together his wardrobe, work on his muscles and we had a few rough ideas on where we wanted to shoot. We didn’t have a very specific goal but we thought our plan would be good enough. When the day came to shoot I showed up to Phil’s house and we went through his wardrobe. We picked some stuff from his closet but to be honest, some of the items were fished out of his dirty clothes hamper – So, we did our best (not very successfully) to try and put together a few looks. We threw some product in his hair, stuffed his wrinkled wardrobe in his backpack and headed down the street to shoot outdoors. Now Phil, for his part had been working VERY hard to be in shape for the shoot. He worked out constantly and didn’t eat much so his Abs would show up in the shoot. His Abs looked great but the problem was he was so hungry that he could barely concentrate; after about a half hour I lost him to fatigue.
So to recap – we were going to shoot an Abercrombie and Fitch Ad on a budget with a dirty wrinkled clothes from Old Navy, flip flops, a model who was so hungry he was ready to pass out and photographer who only had a vague plan about where to shoot. Needless to say it wasn’t a very productive outing. We did manage to get a few nice shoots but for what we vaguely set out to do, it was a bust.
Cut to – 2 years later.  Phil wants to do another shoot. He wants some stock commercial modeling images for his portfolio. I decided to approach the shoot the same way I would with any client. We had a consultation.
The first thing we did was to HAVE a set of GOALS – specific shots he needed. It turned out to be 3 shots in 3 different locations which is do-able but a very long and potentially exhausting day. I prepared him for the day and explained exactly what he would need to do to have the day be a success. I picked 3 locations specifically to lend credibility to the shots we had planned and for the quality of light at the time of day we were planning on shooting.
The next thing we did was talk about HAVING A WARDROBE. I had him start pulling pages out of magazines and online publications so he could see how wardrobe stylists were dressing guys his age in stock photography shoots. There are tons examples on how to dress and style yourself for photo shoots, all you have to do is look for them.  Professional stylists can put together complete looks but also know which colors photograph well and which ones do not. They know how to choose colors that might pop out of a background or conversely steal the focus in a shot. There is a great online tool you can use to start putting together boards of images that you find while surfing the web; it’s a new web site called Pinterest . It’s the perfect place to share inspiration and lay out projects. I highly recommend you check it out.
Once we went through Phil’s wardrobe it was obvious that he didn’t have much in the way of commercial wardrobe. SO, armed with images he collected and some advice from me, he went shopping. ALL professional stylists will pull looks from different stores to style their shoots. They bring LOTS of choices in both style and color so they are prepared for different backgrounds and models. MOST of those clothes get returned by the end of the shoot. Phil bought his 3 complete looks for his 3 shots as well as plenty of options. While he did keep some of the items, he ended up returning most of what he bought so wardrobe didn’t have to cost him a ton of money.
We made sure he had GOOD HAIR and/or MAKEUP. He got his hair was cut a week prior so it had time to settle and he was able to get used to styling it himself. This is something I recommend to everyone. Make sure you don’t make any drastic changes to your hair the day before your shoot. If you’re going to die it or get it cut do it at least a week before. He also bought some simple make up for men. You can get it an Macy’s – I recommend going to the MAC cosmetic counter and Macy’s. They will be happy to find just the right shade of concealer and powder and even teach you how to use it.
Helpful tip for both Men and Women: Go to Macy’s a few hours before your shoot and they will most likely do your make up for you. Professional Makeup artist for free! Just don’t overdo it. And if your budget allows for the added expense, I can arrange for a hair and makeup artist to be on set for your shoot.
 Since we had very specific GOALS I was able to plan out our day; the shoot would take 9 hours total. We schedule breaks and brought plenty of food and drink so he would HAVE ENERGY. In fact, I recommend that you keep your schedule light on your shoot day so you arrive relaxed and ready to HAVE FUN. Get plenty of sleep and drink lots of water starting a few days before your shoot – it will help clear up your skin and minimize the bags under your eyes. Try and avoid tanning beds or spray tans AT LEAST a week before you shoot. Eat frequent small and healthy meals to keep your blood sugar up. Thankfully this time around, Phil didn’t starve himself and lots of energy when he needed it. We had a great shoot! – it was lots of FUN because we were prepared and most importantly, we got ALL the shots we needed.
So there you have it – Five simple tips to help you get the most out of your shoot. Remember, whether your a commercial client with a big budget or you’ve saved up money for a shoot for yourself, Every shoot I book includes consultations and email follow ups so that you feel completely prepared. Let’s make some beautiful images!
Feb
22
“One should really use the camera as though tomorrow you’d be stricken blind. To live the visual life is an enormous undertaking, practically unattainable. I have only touched it, just touched it.”
Dorothea Lange
 We all have our inspirations; whether they be artists, writers, photographers, spiritual leaders or just people in our lives that show us who we’d like to be in the world, or who we’d like to be artistically. Dorothea Lange is one of mine. At a time when women just barely won the right to vote, Dorothea Lange had a career as a commercial portrait photographer in San Francisco in the 1920’s. When the depression hit in the 30s, she took her camera to the streets and started documenting the breadlines, strikes and hardships of the San Francisco residents which lead to her most important work with the Farm Security Administration; collaborating with her second husband, Paul S. Taylor she documented the mass exodus of American farm families making her images some of the most recognized symbols of the Great Depression. During WWII she documented the forced relocation of Japanese Americans to internment camps. Her collection of photo negatives totals over 25,000.


As a photographer, I can’t help thinking about her story. About the drive it took to follow your courage and convictions across the country. About her relationship with Paul Taylor and how dynamic it must have been to have accomplished so much together. To me she embodies a spirit so rarely seen today and one of the most important women of the 20th century. She inspires me to not only be a better photographer, but to be a better person.
source: Dorothea Lange Fellowship
Feb
13
 It’s a cold rainy Monday afternoon as I sit down to write the first blog post on my new web site. I’m in a quandary; I didn’t want to launch my new site without having a blog entry to kick it off with, but I’m not sure exactly what one writes in an inaugural blog. Perhaps I will say this: welcome to my new web site! The site was built by my good friend and very savvy web guru Matt Clower. Besides the new visuals and big beautiful gallery images, it’s interactive, mobile compatible and connected to social media. I invite you to write comments, visit my Facebook and Twitter pages and if you like my work, please pass it on.
In the mean time, I vow to do my best to keep this blog updated fairly often about art and photography so book mark it, RSS feed it and check back often.
Until then have fun browsing the site!
Joe